Author: shrwanswami@gmail.com

  • How Home Service Businesses Can Build Trust With Useful Online Content

    Homeowners often begin a repair, renovation, or property search online long before they make a phone call. They look for explanations of a problem, compare possible solutions, and try to decide which questions to ask a contractor, inspector, or real estate professional. For businesses that serve these readers, publishing clear and accurate information can be a practical way to demonstrate knowledge while helping people make better property decisions.

    Useful online content is not a substitute for licensing, insurance, skilled work, or honest estimates. It can, however, help a homeowner understand the difference between a minor maintenance concern and a situation that needs professional attention. It can also give a local business a more credible presence than a website that only lists services and contact details.

    Start With Problems Property Owners Actually Face

    The most helpful topics usually come from ordinary conversations with customers. A plumber may repeatedly answer questions about recurring drain clogs. A roofing contractor may be asked whether missing shingles require urgent action. A real estate professional may explain the practical effect of deferred maintenance on a sale.

    These questions provide a stronger starting point than broad promotional subjects. They address an immediate concern and allow the writer to explain the limits of do-it-yourself work, common warning signs, and the next sensible step.

    For example, a home repair article may cover:

    • How to recognize a possible hidden water leak
    • What to check before repairing cracked grout
    • Why garage doors become noisy or uneven
    • How seasonal weather affects exterior caulking
    • Which inspection findings deserve follow-up before closing on a home
    • How to plan storage during a garage or basement renovation

    Specific subjects are easier to write accurately because they have a defined purpose. They are also more likely to remain useful than vague articles that attempt to cover every aspect of a major project in a few paragraphs.

    Make Safety and Limits Clear

    Construction and repair advice should never encourage a reader to take unnecessary risks. Electrical work, structural alterations, gas connections, mold concerns, roofing access, and major plumbing failures may require qualified professionals, permits, or both. A responsible article should state those limits plainly.

    It is useful to separate simple observation from repair instruction. A homeowner can safely monitor a water stain, photograph its progression, and identify where the main water shutoff is located. That does not mean they should open a wall, work near electrical wiring, or attempt to repair a pressurized pipe.

    Writers should also avoid presenting every symptom as proof of one cause. A slow drain may result from a local blockage, but it may also indicate a larger drainage issue. A crack in drywall can be cosmetic, seasonal, or related to movement that merits further evaluation. Explaining possible causes without claiming certainty makes information more trustworthy.

    Use a Structure Readers Can Scan

    People looking for home information are often busy or dealing with a stressful problem. Clear organization makes an article easier to use. A practical format may begin with what the issue is, then cover warning signs, likely contributing factors, steps that are safe to take, and situations when professional assessment is appropriate.

    Headings and short lists are especially helpful for maintenance checklists, inspection preparation, and project planning. They should support the explanation rather than replace it. A list saying “check for leaks” is less useful than a brief explanation of where moisture commonly appears and why repeated dampness should not be ignored.

    Include details that affect decisions

    Good property content answers the details that influence a homeowner’s next move. For a garage cabinet article, that could include vehicle-door clearance, load capacity, wall conditions, and access to electrical outlets. For a roofing article, it could include the age of the roof, the location of visible damage, attic moisture, and recent storm exposure.

    This approach helps readers move beyond appearance alone. A clean-looking repair may still be unsuitable if it does not address the source of moisture, movement, poor drainage, or material failure.

    Publish Where the Audience Fits the Topic

    Writing a helpful article is only part of the process. It should appear in a publication whose readers have a reasonable interest in homeownership, repairs, construction, property management, or real estate. A detailed explanation of commercial refrigeration maintenance may fit a facilities or business publication, while a seasonal gutter checklist belongs more naturally on a home-focused site.

    Before contributing an article elsewhere, review the publication’s existing material. Look at its audience, editorial standards, recent topics, and whether the proposed subject adds something useful. Businesses that need assistance identifying suitable outlets can research a guest post placement service, but relevance and editorial quality should remain more important than simply appearing on more websites.

    Publishing on unsuitable sites can confuse readers and dilute the value of the information. One well-matched article that explains a real concern is more useful than several generic pieces placed where no one expects to find them.

    Keep Claims Factual and Local When Necessary

    Property work is shaped by local climate, building practices, codes, permit rules, and housing age. An article should not imply that one recommendation applies everywhere. Freeze protection needs vary by region. Roofing materials perform differently in high-wind, snowy, humid, and intensely sunny climates. Permit requirements can also differ between nearby municipalities.

    When local rules or technical requirements matter, readers should be encouraged to confirm current information with the appropriate building department or qualified professional. This is especially important for articles involving structural work, electrical upgrades, sewer connections, accessory buildings, or property transactions.

    Writers should also avoid unsupported claims about savings, project timelines, or property value. It is reasonable to explain that preventive maintenance may reduce the chance of costly damage. It is less responsible to promise that a particular project will produce a fixed return or eliminate every future repair.

    Update Content as Conditions Change

    A useful article should be reviewed periodically. Product availability changes, building guidance evolves, and older recommendations can become incomplete. A contractor’s service area, qualifications, and emergency availability may also change over time.

    Reviewing older pages is particularly important for seasonal maintenance advice and articles that mention regulations or technical standards. Updating an article does not always require rewriting it completely. It may involve clarifying a safety note, replacing obsolete information, adding a missing warning sign, or removing a statement that is no longer accurate.

    Build Credibility Through Helpfulness

    For home service and real estate businesses, informative publishing works best when it respects the reader’s need for practical answers. Focus on genuine questions, explain risks without exaggeration, use a clear structure, and publish only where the subject fits the audience.

    That standard benefits both sides. Readers gain information that helps them protect a home or plan a project, while knowledgeable professionals have an appropriate way to show the care and judgment they bring to their work.

  • Plumbing Services for Reliable Home and Business Protection

    Plumbing Services for Reliable Home and Business Protection

    Plumbing problems can begin with signs that seem easy to ignore. A dripping faucet, slow drain, weak water pressure, or unusual odor may appear minor, but these issues can indicate developing problems inside a plumbing system. Professional plumbing services can help identify the underlying cause and address it before a small concern becomes an expensive repair.

    A dependable plumbing system plays an important role in protecting a property, maintaining sanitation, and supporting everyday comfort. From routine fixture repairs to drain cleaning, leak detection, water heater work, and emergency repairs, TCR Plumbing provides practical solutions for property owners when plumbing systems do not perform as expected.

    Why Plumbing Services Matter for Property Owners

    Plumbing systems operate continuously, often behind walls, beneath floors, and underground. Because many components remain out of sight, problems can develop without obvious warning. By the time water stains, flooding, or sewer backups become visible, the underlying issue may already require extensive attention.

    Professional plumbing services provide more than a quick response to visible symptoms. Proper diagnosis helps determine what is causing the issue and which repair method is appropriate.

    Common warning signs include:

    • Frequently clogged sinks, tubs, or showers
    • Toilets that continue running after flushing
    • Faucets that drip even when fully closed
    • Unexplained increases in water bills
    • Low or inconsistent water pressure
    • Water stains on ceilings or walls
    • Damp areas around pipes or fixtures
    • Foul odors coming from drains
    • Gurgling sounds from toilets or drains
    • Slow drainage throughout the property

    These signs should not automatically be treated as isolated inconveniences. Recurring problems may point to pipe deterioration, blockages, leaks, sewer line concerns, or other system-related issues.

    Plumbing Services That Help Prevent Major Repairs

    Preventive plumbing care can be particularly valuable for older properties and buildings with frequently used plumbing systems. A professional inspection can reveal problems that may not yet be visible to the property owner.

    For example, a small leak beneath a sink can gradually damage cabinetry and flooring. A partially blocked drain can worsen over time until wastewater backs up into a home or commercial space. Identifying these concerns early can make repairs more manageable.

    Regular attention can include checking exposed pipes, inspecting fixtures, monitoring water pressure, and addressing recurring drainage problems. Property owners should also avoid repeatedly treating the same plumbing symptom without determining its cause.

    A drain that repeatedly becomes clogged deserves more than another temporary solution. Professional diagnosis can establish whether the problem involves buildup, a deeper blockage, damaged piping, or a sewer-related concern.

    Professional Drain Cleaning Goes Beyond Temporary Fixes

    Drainage problems are among the most common plumbing concerns. Hair, grease, food particles, mineral deposits, foreign objects, and other materials can restrict water flow. Over time, a blockage can become severe enough to cause standing water, unpleasant odors, or wastewater backups.

    Professional drain cleaning can provide a more targeted approach. Depending on the condition and location of the blockage, plumbers may use specialized equipment designed to clear accumulated materials and restore proper flow.

    For difficult or recurring drainage issues, identifying the exact location and condition of the blockage is particularly important. Repeatedly clearing a drain without addressing the underlying cause may only provide short-term relief.

    TCR Plumbing provides drain cleaning and plumbing services designed to address residential and commercial plumbing concerns. Professional assistance can help property owners understand the condition of a drainage system before selecting a repair or cleaning method.

    Plumbing Services and Leak Detection

    Water leaks can cause more than wasted water. Hidden leaks may contribute to damaged drywall, flooring, cabinetry, insulation, or other building materials. In some cases, the source of the leak may be difficult to locate because plumbing lines run behind finished surfaces or beneath a property.

    Leak detection can help narrow down the location of a problem before unnecessary areas are opened or repaired. Professional plumbers can evaluate symptoms such as unexplained moisture, water stains, increased water consumption, or changes in water pressure.

    A fast response is especially important when a pipe breaks or a significant leak develops. Turning off the water supply, when safely possible, can help limit additional damage while professional assistance is arranged.

    Property owners should never assume that a small visible leak is the full extent of a plumbing problem. Moisture can travel through building materials, meaning the location where water appears may not be the location where the leak started.

    The Importance of Sewer Line Maintenance

    Sewer lines perform a critical function by carrying wastewater away from a property. When a sewer line becomes blocked or damaged, the consequences can affect multiple fixtures at once.

    Warning signs may include:

    • Several drains becoming slow simultaneously
    • Persistent sewage odors
    • Gurgling toilets
    • Water backing up into tubs or showers
    • Repeated sewer-related blockages
    • Unusually wet areas around outdoor sewer lines

    Tree roots, accumulated debris, deteriorating pipes, and other obstructions can affect sewer line performance. A professional inspection can help determine whether the issue involves a localized blockage or a more serious line condition.

    In-line camera inspections can be particularly useful because they allow technicians to view the inside of a plumbing or sewer line. This type of diagnostic approach can provide information about blockages, cracks, root intrusion, and other conditions that may not be visible from outside the pipe.

    Water Heater Plumbing Services

    Hot water is essential for bathing, cleaning, cooking, and many commercial activities. When a water heater begins to malfunction, the disruption can affect an entire household or business.

    Signs of potential water heater trouble can include inconsistent water temperature, unusual noises, visible leakage, insufficient hot water, or water that appears discolored.

    Rather than waiting for a complete failure, property owners can arrange professional evaluation when these warning signs appear. A qualified plumber can assess the equipment and determine whether repair, maintenance, or replacement is the most practical option.

    Water heater installation also requires careful attention to connections, safety requirements, capacity, and system compatibility. Professional installation helps ensure that the equipment is correctly connected and suitable for the property’s needs.

    Emergency Plumbing Services Require Quick Action

    Some plumbing problems cannot wait for a convenient appointment. A burst pipe, major leak, overflowing toilet, sewer backup, or serious drainage failure can quickly interfere with daily activities and cause property damage.

    During an emergency, property owners should focus first on reducing immediate risks.

    1. Shut off the water supply if it can be done safely.
    2. Keep people away from areas affected by standing water when electrical hazards may be present.
    3. Remove belongings from the affected area when possible.
    4. Avoid using plumbing fixtures connected to a suspected sewer backup.
    5. Contact a qualified professional for diagnosis and repair.

    Fast action does not replace professional assessment. Emergency repairs should address both the immediate damage and the cause of the failure so that the same problem is less likely to return.

    TCR Plumbing offers emergency plumbing assistance for residential and commercial customers in the Raleigh Triangle. Having access to professional help during urgent situations can make it easier to respond when a plumbing failure occurs outside normal business hours.

    Choosing the Right Plumbing Services

    Selecting a plumber involves more than finding the lowest quoted price. Plumbing work can affect water quality, sanitation, property condition, and long-term system performance, so experience and proper qualifications matter.

    Before hiring a plumbing company, consider several practical factors:

    • Licensing and insurance
    • Experience with the type of plumbing issue involved
    • Availability for urgent repairs
    • Range of residential and commercial services
    • Diagnostic equipment and repair capabilities
    • Clear communication about recommended work
    • Reputation and customer experience
    • Transparent information about service costs

    A company capable of handling multiple plumbing needs can also simplify maintenance. Instead of searching for separate specialists for drainage, leaks, water heaters, and sewer concerns, property owners may benefit from working with a full-service plumbing provider.

    TCR Plumbing has served the Raleigh Triangle since 1993 and provides residential and commercial plumbing solutions. Services include drain cleaning, leak detection, sewer line work, water heater services, hydro jetting, emergency repairs, and other plumbing needs.

    Practical Ways to Protect a Plumbing System

    Professional service is important, but daily habits also influence plumbing performance. Property owners can take several simple steps to reduce unnecessary strain on fixtures and drainage systems.

    Avoid placing grease, oils, coffee grounds, wipes, paper products, and other unsuitable materials down drains or toilets. Use drain screens where appropriate to reduce the amount of hair and debris entering pipes.

    Pay attention to changes rather than waiting for a complete failure. A toilet that runs continuously, a faucet that begins leaking, or a drain that becomes increasingly slow can provide an opportunity to address the issue before more serious damage occurs.

    It is also useful to know where the property’s main water shutoff is located. During a major leak, knowing how to stop the water supply can help limit damage while waiting for professional assistance.

    Conclusion: Make Plumbing Maintenance a Priority

    A plumbing system should not receive attention only after a major failure occurs. Small leaks, recurring clogs, unusual odors, water pressure changes, and other warning signs can provide valuable opportunities to identify problems early.

    Professional plumbing services can support safer, more dependable plumbing performance through accurate diagnosis, appropriate repairs, preventive maintenance, and emergency assistance. For homeowners and businesses in the Raleigh Triangle, TCR Plumbing provides experienced support for a broad range of residential and commercial plumbing needs.

    Taking action when a problem first appears can help protect the property, reduce disruption, and prevent minor plumbing concerns from developing into major repairs.

  • Custom Garage Cabinets for a More Functional Garage

    Custom Garage Cabinets for a More Functional Garage

    A garage can serve as far more than a place to park a vehicle. With the right storage strategy, it can become a clean, organized extension of the home for tools, sports equipment, seasonal items, automotive supplies, and hobbies. 

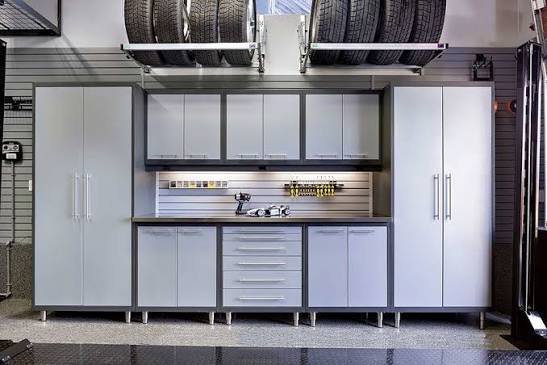
    Custom garage cabinets provide a practical way to bring order to that space while making better use of available walls and floor area. For homeowners planning a garage upgrade, Superior Garage Flooring understands that effective organization starts with storage designed around how the space is actually used.

    Why Garage Storage Deserves More Attention

    Garage clutter often develops gradually. A few tools get placed on a workbench, seasonal decorations occupy a corner, and outdoor equipment ends up leaning against the wall. Before long, usable floor space becomes difficult to access.

    Generic storage products may provide some relief, but they do not always account for the garage’s dimensions or the homeowner’s specific needs. Fixed shelving may leave awkward gaps, while freestanding cabinets can consume valuable floor space without making the most of vertical areas.

    A well-planned garage storage system takes a different approach. It considers the available wall space, ceiling height, door clearance, vehicle placement, work areas, and the items that need to be stored.

    This makes storage part of the garage’s overall design rather than an afterthought.

    Custom Garage Cabinets vs. Standard Storage

    The biggest advantage of custom garage cabinets is flexibility. Instead of adapting your belongings to a predetermined cabinet size, the storage plan can be considered around the space and the items that need to be organized.

    Standard storage can still be useful for simple needs. However, custom solutions can address challenges such as:

    • Unusual wall dimensions
    • Limited floor space
    • Different storage requirements
    • Dedicated work areas
    • Tall or oversized equipment
    • Frequently used tools and supplies
    • A preference for concealed storage

    Cabinet configurations can also help separate different categories of belongings. For example, automotive supplies can have a designated area while gardening tools, sporting equipment, and household storage remain separate.

    That organization can make it easier to find items and maintain the garage over time.

    How to Plan Custom Garage Cabinets

    Good garage organization begins before cabinet installation. A thoughtful planning process helps prevent wasted space and ensures the finished system supports everyday activities.

    1. Take Inventory of What You Store

    Start by identifying everything that currently occupies the garage. Group similar items together and consider which belongings are used frequently, occasionally, or only seasonally.

    This process can reveal the type of storage you actually need. Small hand tools require different arrangements than power equipment, cleaning products, camping gear, or large sporting equipment.

    It is also a good opportunity to remove damaged, unused, or duplicate items before designing the storage system.

    2. Measure the Available Space

    Accurate measurements are essential for any garage cabinetry project. Consider wall length, ceiling height, corners, windows, doors, electrical outlets, and other permanent features.

    Vehicle clearance should also remain a priority. Cabinets should provide useful storage without making it difficult to open vehicle doors or walk safely around parked cars.

    Measurements should account for how the garage functions as a whole, not simply how many cabinets can fit along one wall.

    3. Consider Accessibility

    Not everything needs to be stored at the same height. Frequently used tools and supplies should be easy to reach, while seasonal belongings can occupy less accessible areas.

    Think about daily routines when deciding where items belong. A storage system is more effective when it reduces unnecessary searching, reaching, and moving.

    Cabinet organization should support the way the homeowner uses the garage rather than simply creating more enclosed space.

    Storage Features That Improve Garage Organization

    Garage cabinets become more useful when their configuration reflects specific storage demands. A combination of enclosed cabinets, drawers, shelving, and work surfaces can accommodate different categories of belongings.

    Enclosed cabinets are particularly useful for items that homeowners want kept out of sight. They can help create a cleaner visual appearance while protecting stored belongings from everyday garage activity.

    Drawers can be useful for smaller tools, fasteners, accessories, and other items that can easily become scattered. Keeping these smaller belongings organized can make a work area more practical.

    Tall storage sections can accommodate longer equipment, while wider cabinets can provide room for larger items. The goal is not simply to maximize cabinet capacity but to assign appropriate storage to different belongings.

    Pair Cabinetry With a Functional Work Area

    For homeowners who use the garage for repairs, maintenance, crafts, or DIY projects, storage and workspace should work together.

    A dedicated workbench can provide a stable surface for projects while nearby cabinets keep frequently used equipment within reach. This arrangement can reduce unnecessary movement around the garage and make it easier to return tools to their proper locations.

    Lighting should also be considered. A well-organized cabinet system does little good if work surfaces are poorly illuminated.

    Electrical access, task lighting, and the placement of commonly used tools should be considered during the planning stage rather than after installation.

    Garage Cabinet Materials and Durability Matter

    Garages can experience conditions that differ from those inside the home. Temperature changes, dust, moisture, vehicle fluids, and frequent activity can all influence how storage components perform over time.

    For that reason, homeowners should consider durability alongside appearance.

    When comparing garage cabinetry, ask about the construction, hardware, finish, weight capacity, cleaning requirements, and intended environment. These details provide more meaningful information than appearance alone.

    It is also important to consider how the storage system will be used. A cabinet designed for light household storage may not be the right choice for a garage work area containing heavier tools and equipment.

    Think Beyond Storage Capacity

    More storage does not automatically mean a more functional garage.

    A successful organization system should make the space easier to use. If cabinets are filled without a clear system, homeowners may simply create a more concealed version of the same clutter.

    Consider creating zones within the garage. One section might accommodate automotive supplies, another could serve as a workshop, and another could hold seasonal or recreational equipment.

    Clear categories make it easier to decide where belongings should go after each use.

    Labeling drawers or cabinet sections can also help households maintain the system, particularly when multiple people use the garage.

    Integrate Cabinets With the Overall Garage Design

    Storage should complement the rest of the garage rather than compete with it. Cabinet placement, flooring, lighting, wall finishes, and work areas can be planned as parts of a cohesive environment.

    This is especially important when homeowners are investing in a broader garage renovation. Coordinating storage with other improvements can create a more intentional appearance and prevent individual upgrades from feeling disconnected.

    A clean garage design can also influence how likely homeowners are to maintain the space. When everything has a designated location, returning an item after use becomes a simpler habit.

    Questions to Ask Before Investing in Garage Cabinetry

    Before selecting a storage system, homeowners should evaluate more than cabinet style. Asking the right questions can help clarify whether a proposed solution will meet long-term needs.

    Consider these points:

    1. What items need to be stored?
      Categorize tools, equipment, seasonal belongings, automotive products, and household supplies.
    2. How much space can be dedicated to storage?
      Account for vehicles, walkways, doors, windows, and work areas.
    3. Which belongings need frequent access?
      Keep commonly used items in convenient locations.
    4. What level of durability is appropriate?
      Match construction and hardware to the expected use.
    5. How will the system accommodate future needs?
      Consider whether hobbies, equipment, or household storage requirements could change.
    6. Will the cabinetry support the overall garage design?
      Look at storage alongside flooring, lighting, work surfaces, and other improvements.

    A Better Garage Starts With Intentional Storage

    Garage organization is most effective when it begins with a clear understanding of how the space needs to function. Custom garage cabinets can provide more than additional storage. When properly planned, they can create defined zones, improve accessibility, support work areas, and make better use of otherwise overlooked wall space.

    The best approach is to assess the garage as a complete environment. Measure carefully, identify storage categories, prioritize frequently used belongings, consider durability, and plan cabinetry around everyday movement. Superior Garage Flooring can help homeowners create a more organized garage with storage solutions designed around their space and needs.

    With those fundamentals in place, a cluttered garage can become a practical and organized space that supports parking, projects, hobbies, and household storage for years to come.

  • Refrigeration Repair Tips Every Business Should Know

    Refrigeration Repair Tips Every Business Should Know

    Commercial refrigeration is one of the most important investments for businesses that depend on food safety, product freshness, and operational efficiency. Restaurants, grocery stores, convenience stores, warehouses, and healthcare facilities all rely on dependable refrigeration systems every day. When equipment fails unexpectedly, the consequences can include spoiled inventory, business interruptions, and costly emergency expenses. That is why understanding refrigeration repair and preventive maintenance is essential for every business owner.

    Rather than waiting until a breakdown occurs, businesses can reduce downtime, extend equipment life, and save money by recognizing early warning signs and following smart maintenance practices. A proactive approach keeps operations running smoothly while protecting valuable inventory and customer trust.

    Why Refrigeration Repair Should Never Be Delayed

    Minor refrigeration issues often develop gradually before becoming major system failures. A small refrigerant leak, dirty condenser coils, or a malfunctioning thermostat may seem insignificant at first. However, these problems force equipment to work harder, increasing energy consumption and accelerating wear on critical components.

    Delaying repairs can lead to several costly consequences including

    • Food spoilage and inventory loss
    • Higher utility bills
    • Unexpected equipment failure
    • Business interruptions
    • Expensive emergency service calls
    • Shortened equipment lifespan

    Addressing small issues early is almost always less expensive than replacing major components after a complete system breakdown.

    Common Signs Your Commercial Refrigerator Needs Repair

    Many refrigeration systems provide warning signs before they stop working completely. Recognizing these symptoms allows businesses to schedule service before operations are disrupted.

    Watch for these common indicators

    Inconsistent Temperatures

    If products are freezing unexpectedly or temperatures fluctuate throughout the day, the refrigeration system may have problems with sensors, thermostats, airflow, or refrigerant levels.

    Unusual Noises

    Grinding, buzzing, clicking, or rattling sounds often indicate worn motors, loose components, compressor issues, or failing fans.

    Frost or Ice Buildup

    Excessive frost inside freezers or on evaporator coils usually signals airflow restrictions, faulty door seals, or defrost system problems.

    Water Leaks

    Pooling water around refrigeration equipment can result from clogged drain lines, damaged seals, or condensation issues that require prompt attention.

    Increased Energy Bills

    A sudden spike in electricity usage often indicates that refrigeration equipment is operating inefficiently due to mechanical problems.

    The Importance of Preventive Maintenance

    Preventive maintenance remains one of the most effective ways to reduce the need for major refrigeration repair services. Routine inspections help technicians identify developing problems before they become expensive emergencies.

    A comprehensive maintenance program typically includes

    • Cleaning condenser coils
    • Inspecting refrigerant levels
    • Checking electrical connections
    • Testing temperature controls
    • Verifying fan operation
    • Inspecting door gaskets
    • Cleaning drain lines
    • Monitoring compressor performance

    Routine service improves efficiency while helping businesses comply with food safety standards and manufacturer recommendations.

    How Refrigeration Repair Improves Energy Efficiency

    Energy costs continue to be one of the largest operating expenses for many commercial facilities. Refrigeration systems often account for a significant percentage of total electricity consumption.

    Even relatively small mechanical issues can dramatically increase energy usage. Dirty condenser coils reduce heat transfer efficiency. Refrigerant leaks force compressors to work harder. Faulty fans reduce airflow throughout the system.

    Professional repairs restore equipment performance and allow refrigeration systems to operate closer to their original efficiency levels. Lower energy consumption translates into measurable cost savings over time.

    Protecting Food Safety Through Timely Repairs

    Temperature consistency is critical for businesses that store food, beverages, pharmaceuticals, or temperature-sensitive products.

    Improper refrigeration temperatures may allow harmful bacteria to grow, resulting in food safety risks and regulatory compliance issues. Businesses may also experience product recalls, damaged reputations, and financial losses.

    Prompt refrigeration service helps maintain proper storage temperatures while reducing the risk of inventory loss and health concerns.

    When to Repair Versus Replace Commercial Refrigeration Equipment

    Business owners often wonder whether repairing older equipment remains a worthwhile investment.

    Several factors should be considered

    Repair May Be the Better Choice When

    • The equipment is relatively new.
    • Repairs are minor.
    • Maintenance history is consistent.
    • Energy efficiency remains acceptable.

    Replacement May Be Worth Considering When

    • Repairs become increasingly frequent.
    • Major components repeatedly fail.
    • Energy costs continue rising.
    • The unit approaches the end of its expected service life.
    • Replacement parts become difficult to obtain.

    An experienced refrigeration technician can evaluate the system and recommend the most cost-effective solution based on long-term operating costs rather than immediate expenses alone.

    Choosing the Right Refrigeration Repair Company

    Not every service provider offers the same level of expertise. Selecting a qualified commercial refrigeration contractor can significantly affect equipment reliability and repair quality.

    Look for companies that provide

    • Experienced commercial refrigeration technicians
    • Emergency repair availability
    • Preventive maintenance programs
    • Fast response times
    • Transparent estimates
    • Modern diagnostic equipment
    • Experience with multiple refrigeration brands
    • Strong customer reviews

    A trusted service partner becomes an extension of your business by helping minimize downtime and maximize equipment performance.

    Simple Maintenance Tips Between Professional Service Visits

    Although professional inspections remain essential, business owners and employees can perform simple tasks that support refrigeration system health.

    Helpful daily and weekly practices include

    1. Keep condenser areas free of dust and debris.
    2. Avoid blocking interior airflow with products.
    3. Check door seals regularly for damage.
    4. Monitor operating temperatures daily.
    5. Clean spills promptly.
    6. Listen for unusual noises.
    7. Report small problems immediately.
    8. Schedule regular preventive maintenance.

    These simple habits can prevent many common refrigeration issues from becoming expensive repairs.

    The Business Value of Reliable Refrigeration

    Reliable refrigeration supports more than equipment performance. It directly impacts customer satisfaction, product quality, employee productivity, and overall profitability.

    Unexpected downtime affects daily operations, delays service, increases labor costs, and creates unnecessary stress for employees. Investing in proactive maintenance and timely repairs protects both your equipment and your reputation.

    Businesses that prioritize refrigeration reliability often experience fewer emergency service calls, longer equipment life, and more predictable operating costs.

    Protect Your Refrigeration Investment 

    Refrigeration repair plays a vital role in keeping commercial refrigeration systems running around the clock so businesses can operate efficiently. Ignoring small warning signs can quickly lead to expensive repairs, inventory loss, and operational disruptions. By investing in preventive maintenance, recognizing early symptoms of equipment problems, and scheduling professional refrigeration repair when needed, businesses can reduce long-term costs while maintaining dependable performance. 

    Whether you operate a restaurant, supermarket, convenience store, healthcare facility, or food distribution center, partnering with experienced professionals ensures your refrigeration equipment continues performing when you need it most. Learn more about expert refrigeration repair services from Buffos Refrigeration at buffos-refrigeration.

  • Home Color Palette Ideas: How to Choose the Right One

    Home Color Palette Ideas: How to Choose the Right One

    Introduction

    Choosing colors for an entire home feels a lot harder than picking one room’s paint shade. Suddenly you’re thinking about flow between spaces, how colors work together, and whether that bold accent wall will actually age well. Good home color palette ideas aren’t about following one trendy scheme blindly — they’re about building a system that works across your whole home, room by room, without feeling disjointed. I made the mistake early on of picking colors room by room with zero coordination, and the result felt chaotic walking through the house. This guide covers how to actually build a cohesive palette in 2026.


    1. Start With a Base Neutral

    Every good home color palette needs an anchor — a neutral that appears in some form across most rooms, tying everything together.

    Quick answer: The foundation of effective home color palette ideas is choosing one versatile neutral — like warm white, soft grey, or light beige — that can be used consistently across connected spaces, creating visual flow even as accent colors change room to room.

    2. Understand the 60-30-10 Rule

    This classic design principle genuinely simplifies decision-making, and it works well for Indian homes too.

    • 60% dominant color: usually walls, the largest visual surface
    • 30% secondary color: furniture, larger decor pieces
    • 10% accent color: cushions, art, smaller decorative details

    I’ve noticed people skip this ratio and end up with too many competing colors fighting for attention. Following even a rough version of 60-30-10 makes rooms feel more intentional.

    3. Consider Your Home’s Natural Light

    Light exposure dramatically affects how colors actually read once painted, something swatches on a screen or in-store rarely capture accurately. [link to related paint color guide here]

    Direct answer: North-facing rooms with cooler light generally suit warmer color palettes to balance the coolness, while south-facing rooms with abundant warm light can handle cooler tones like blues and greens without feeling cold.

    4. Choose a Palette Based on Mood, Not Just Trends

    Picture a small business owner in Jaipur who initially chose a trendy dark academia palette for her home office because it looked good online — within weeks, she found the space felt heavy and uninspiring for actual work. She switched to a lighter, sage-and-cream palette, and her mood in that room improved noticeably.

    • Calming spaces (bedrooms): soft blues, sage greens, muted lavenders
    • Energizing spaces (kitchens, workspaces): warm yellows, soft corals, bright whites
    • Social spaces (living rooms): warm neutrals, earthy tones, occasional bold accents

    5. Build Palettes Around a Single Inspiration Piece

    A rug, a piece of art, or even a favorite fabric can anchor an entire room’s color scheme, making decisions far easier than starting from scratch.

    • Pull 2-3 colors directly from your inspiration piece
    • Use the dominant color for walls, secondary tones for accents
    • This approach naturally prevents mismatched, random color choices

    6. Test Colors Together, Not in Isolation

    Has this ever happened to you — loving a color on its own, then realizing it clashes badly once placed next to your existing furniture or flooring? Testing combinations together avoids this entirely.

    • Hold paint swatches next to existing furniture and flooring before deciding
    • Test combinations in the actual room, under actual lighting conditions
    • Consider how adjacent rooms’ colors will look together through open doorways

    7. Don’t Ignore Flooring and Fixed Elements

    Tiles, wood flooring, and countertops are expensive to change, so your color palette should work around them rather than against them. [link to related flooring comparison guide here]

    • Warm-toned wood flooring pairs well with warm neutral palettes
    • Cool-toned grey tiles work better with cooler color schemes
    • Match undertones, not just general color categories, for a cohesive look

    8. Allow Room for Evolution

    A color palette doesn’t need to be permanent or perfectly planned from day one. Starting with a solid neutral base gives you flexibility to update accent colors as tastes change, without a full repaint.


    Frequently Asked Questions

    Q1: How many colors should a home color palette include? Generally 3-5 colors work best — one dominant neutral, one or two secondary tones, and one or two accent colors for details.

    Q2: Should every room in my home use the same color palette? Not identical, but connected — sharing a base neutral across rooms while varying accent colors creates cohesion without monotony.

    Q3: How do I know if a color will look different once painted on a full wall? Always test a large sample swatch (at least 2×2 feet) on the actual wall and observe it under different lighting throughout the day.

    Q4: What’s a safe color palette for a home I plan to sell eventually? Warm neutrals with subtle, easily updatable accent colors tend to appeal to the widest range of potential buyers.

    Q5: Can I mix warm and cool tones in one home color palette? It’s possible but requires care — generally, sticking to one dominant temperature (warm or cool) throughout creates a more cohesive result.

    Q6: How often should a home color palette be updated? There’s no fixed timeline, but many homeowners refresh accent colors every 3-5 years while keeping the neutral base consistent longer.


    Conclusion

    Solid home color palette ideas come down to building a flexible system rather than picking colors room by room in isolation. Start with a neutral base, apply the 60-30-10 rule loosely, and test combinations directly in your space before committing to gallons of paint. Take it one room at a time if the whole-home approach feels overwhelming — consistency matters more than speed here.


    Suggested Image Alt Text:

    1. “Warm neutral color palette swatches for home design”
    2. “Living room showing 60-30-10 color rule applied”
    3. “Sage green and cream color scheme in a home office”
  • 10 Interior Design Trends Dominating 2026

    10 Interior Design Trends Dominating 2026

    Introduction

    Every year brings a fresh batch of “trends” that mostly amount to recycled ideas with new names attached. Some of the interior design trends 2026 genuinely feel different, though — driven by practical shifts like smaller living spaces, sustainability concerns, and people spending more time at home than they used to. I’ve been watching design shifts for a few years now, and this year feels like a real move away from the overly minimalist, all-white aesthetic that dominated for so long. Here’s what’s actually showing up in homes right now, not just design magazines.


    1. Warm Minimalism Replaces Stark Minimalism

    Pure white, sterile minimalism is fading. What’s replacing it feels warmer without losing the clean, uncluttered appeal.

    Quick answer: One of the clearest interior design trends 2026 is warm minimalism — combining clean, uncluttered layouts with earthy tones, natural textures, and warmer lighting, moving away from the stark white aesthetic that dominated previous years.

    2. Curved and Organic Furniture Shapes

    Sharp, angular furniture is giving way to softer, rounded silhouettes. Curved sofas, oval coffee tables, and rounded mirrors are showing up everywhere this year.

    I’ve noticed this shift feels particularly good in smaller Indian apartments — curved furniture creates better flow in tight spaces compared to boxy, angular pieces that eat into walkways.

    3. Biophilic Design Continues Growing

    Bringing nature indoors isn’t new, but it’s expanding beyond just a few potted plants into genuinely integrated design choices. [link to related low maintenance garden guide here]

    Direct answer: Biophilic design in 2026 goes beyond decorative plants to include natural materials like rattan and wood, maximized natural light, and layouts that create a visible connection to outdoor spaces — a defining element of current interior design trends 2026.

    4. Multi-Functional Furniture for Compact Living

    Picture a small business owner in Jaipur who converted her one-bedroom apartment’s living room into a flexible workspace using a fold-away desk and a storage ottoman — this kind of adaptable furniture is increasingly central to how smaller urban homes are being designed.

    • Sofa beds and extendable dining tables remain popular for flexible living
    • Nesting tables and stackable storage solutions maximize compact spaces
    • Wall-mounted, fold-away furniture is gaining traction in studio apartments

    5. Textured Walls Over Flat Paint

    Flat, single-color walls are getting texture treatments — limewash finishes, textured plaster, and fabric wall panels add depth without needing bold color.

    • Limewash paint creates a subtle, artisanal texture on walls
    • Textured plaster finishes work particularly well in living and dining areas
    • Fabric or wood paneling adds warmth to bedroom accent walls

    6. Sustainable and Local Materials

    Sustainability isn’t just a buzzword this year — it’s genuinely influencing material choices. Has this crossed your mind when furniture shopping — where the materials actually come from?

    • Locally sourced wood and stone reduce environmental impact
    • Reclaimed and upcycled furniture pieces are gaining mainstream appeal
    • Natural fiber textiles (jute, cotton, linen) replace synthetic alternatives increasingly

    7. Statement Lighting as Functional Art

    Lighting fixtures have moved from purely functional to genuine design statements, often serving as a room’s focal point rather than an afterthought.

    • Sculptural pendant lights over dining tables and kitchen islands
    • Layered lighting combining ambient, task, and accent sources
    • Warm-toned bulbs replacing cooler, harsher lighting throughout homes

    8. Personalized, Maximalist Accents Within Minimal Frameworks

    Interestingly, pure minimalism is softening to allow more personal expression — bold art pieces, family heirlooms, or collected objects displayed intentionally within an otherwise simple space.

    • One or two statement art pieces within a neutral room
    • Curated collections displayed rather than hidden away
    • Personal, meaningful objects taking priority over generic decor

    Frequently Asked Questions

    Q1: What’s the biggest shift in interior design trends 2026 compared to previous years? The move away from stark, all-white minimalism toward warmer, textured, and more personalized spaces is the most noticeable shift this year.

    Q2: Are these design trends practical for small Indian apartments? Yes, many of these trends — multi-functional furniture, curved shapes, biophilic elements — are particularly well-suited to compact urban living spaces.

    Q3: Is sustainable material sourcing more expensive than conventional options? Sometimes slightly, but locally sourced and reclaimed materials can actually be more affordable than imported alternatives in many cases.

    Q4: Do I need to redecorate my entire home to follow these trends? Not at all — incorporating one or two elements, like textured walls or statement lighting, can refresh a space without a full renovation.

    Q5: How long do interior design trends typically last? Some trends fade within a year or two, while others, like biophilic design, have shown staying power over multiple design cycles.

    Q6: What’s a budget-friendly way to try these trends without major investment? Start with lighting and textiles — swapping bulbs, adding textured cushions, or introducing plants requires minimal investment for noticeable impact.


    Conclusion

    These interior design trends 2026 point toward warmer, more personalized spaces that still feel intentional rather than cluttered. You don’t need to overhaul your entire home to incorporate them — pick one or two elements that genuinely resonate, whether that’s textured walls, curved furniture, or better lighting. Design trends come and go, but comfort and personal connection to your space rarely go out of style.


    Suggested Image Alt Text:

    1. “Warm minimalist living room with earthy tones and natural textures”
    2. “Curved sofa design reflecting 2026 interior trends”
    3. “Statement pendant lighting over a dining table”
  • How to Decorate Your Home on a Tight Budget

    How to Decorate Your Home on a Tight Budget

    Introduction

    Decorating on a budget doesn’t have to mean settling for a half-finished-looking home. It just means being smarter about where the money actually goes. I’ve moved into a few rental apartments over the years with barely any budget to spare, and the ones that ended up feeling the most “put together” weren’t the ones I spent the most on — they were the ones where I focused spending on a few key pieces instead of spreading it thin everywhere. If you’re trying to decorate home on a budget without it looking obviously cheap, this guide covers what genuinely works in 2026.


    1. Prioritize a Few Statement Pieces Over Many Small Ones

    Spreading a small budget across dozens of tiny decor items usually looks cluttered and unintentional.

    Quick answer: When you decorate home on a budget, spending on one or two statement pieces — a good rug, an interesting light fixture, or a striking piece of art — creates far more visual impact than buying many small, forgettable decor items.

    2. Rearrange Before You Buy Anything

    This costs literally nothing, and it’s the step most people skip entirely. I’ve noticed just moving existing furniture into a different layout can make a room feel completely refreshed.

    • Try moving your sofa away from the wall for a more open feel
    • Swap decor between rooms — a lamp from the bedroom might suit the living room better
    • Reassess furniture placement before assuming you need something new

    3. Thrift and Secondhand Shopping Actually Works

    Secondhand furniture markets and online resale platforms have genuinely good finds if you’re patient and check regularly. [link to related decorating ideas guide here]

    Direct answer: Thrifted or secondhand furniture, when chosen carefully, can look just as good as new pieces at a fraction of the cost — a fresh coat of paint or new hardware on an older piece often transforms it completely.

    4. DIY Simple Projects Instead of Buying Ready-Made

    Picture a small business owner in Jaipur who couldn’t afford new curtains for her café’s seating area — she dyed plain cotton fabric herself and stitched simple curtains for a fraction of store prices, and honestly, they looked more unique than anything store-bought.

    • Repaint old furniture instead of replacing it
    • Make simple no-sew curtains from affordable fabric
    • Create wall art using printed photos or affordable frames

    5. Use Plants as Affordable Decor

    Plants add life and color to a space for relatively little money, and they don’t feel “cheap” the way some decor shortcuts can.

    • A few potted plants cost far less than most decorative accessories
    • Group plants of varying heights for visual interest without buying anything else
    • Even artificial plants have improved significantly if maintenance is a concern

    6. Focus on Lighting — It Changes Everything

    Has this ever happened to you — a room that just feels “off” despite decent furniture? Often it’s the lighting, not the decor itself.

    • Swap harsh overhead lighting for warmer, layered lamp lighting
    • Affordable string lights add warmth without a big investment
    • Even changing bulb color temperature makes a noticeable difference

    7. Update Small Details Instead of Big Furniture

    Small, affordable swaps often create more visible change than people expect, without the cost of replacing major furniture pieces.

    • New cushion covers refresh a sofa without buying a new one
    • Updated cabinet or drawer hardware modernizes furniture cheaply
    • A new doormat or entryway rug improves first impressions affordably

    8. Shop Sales and Off-Season for Bigger Purchases

    For anything you genuinely need to buy new, timing matters. Festival sales and off-season discounts in India often bring significant price drops on furniture and decor. [link to related home improvement ideas guide here]


    Frequently Asked Questions

    Q1: What’s the cheapest way to make a room look decorated? Rearranging existing furniture and adding a few plants — both cost little to nothing and make an immediate visual difference.

    Q2: Is secondhand furniture a good option for budget decorating? Yes, especially with a fresh coat of paint or updated hardware, secondhand pieces can look just as good as new ones.

    Q3: How much should I budget for decorating a room affordably? A meaningful refresh is often possible for ₹5,000-₹15,000 per room, focusing on a few key pieces rather than a complete overhaul.

    Q4: What decorating mistakes should I avoid on a tight budget? Avoid buying many small, cheap items — they add clutter without impact. Prioritize fewer, better-chosen pieces instead.

    Q5: Are DIY decor projects actually cheaper than buying ready-made? Usually yes, especially for items like curtains, wall art, or refurbished furniture, though it requires more time and effort.

    Q6: When’s the best time to buy furniture and decor at lower prices? Festival seasons and end-of-season sales in India typically offer the best discounts on furniture and home decor items.


    Conclusion

    You genuinely can decorate home on a budget without it looking unfinished or cheap — it just takes more intention than throwing money at the problem. Start by rearranging what you already have, then invest selectively in one or two statement pieces that actually matter. Small, thoughtful changes consistently outperform a scattered spending approach, and your home will feel more “you” for it too.


    Suggested Image Alt Text:

    1. “Budget-friendly living room decorated with plants and cushions”
    2. “Thrifted furniture repainted for an affordable home makeover”
    3. “Warm layered lighting transforming a budget-decorated room”
  • Small Space Decorating Ideas to Make Rooms Look Bigger

    Small Space Decorating Ideas to Make Rooms Look Bigger

    Introduction

    Small apartments get a bad reputation, mostly because people decorate them like they’re big ones and then wonder why everything feels cramped. Good small space decorating ideas aren’t about squeezing in less furniture — they’re about tricking the eye into perceiving more space than actually exists. I lived in a genuinely tiny one-bedroom for a couple of years and learned most of this through trial and error, usually after buying the wrong piece of furniture first. This guide covers what actually works for making compact rooms feel open, going into 2026.


    1. Use Mirrors Strategically

    This is probably the most effective trick in the entire list, and it costs relatively little compared to other options.

    Quick answer: Placing a large mirror opposite a window is one of the most effective small space decorating ideas because it reflects natural light and visually doubles the perceived depth of a room, making it feel significantly more open.

    2. Choose Furniture With Visible Legs

    Furniture that sits flush to the floor blocks sightlines and makes rooms feel heavier and more cluttered than they actually are.

    • Sofas and chairs with visible legs let light pass underneath
    • Creates a sense of continuous floor space, even in tight rooms
    • Avoid bulky, boxy furniture that visually “sits” on the floor

    I’ve noticed this one detail makes a bigger difference than people expect — the same room with leggy furniture versus flush furniture genuinely feels different in size.

    3. Stick to a Light, Cohesive Color Palette

    Dark colors absorb light and visually shrink a room. Light, cohesive tones do the opposite. [link to related paint color guide here]

    Direct answer: A light, cohesive color palette across walls, furniture, and textiles is one of the simplest small space decorating ideas, since consistent light tones eliminate visual breaks that make rooms feel choppy and smaller than they are.

    4. Go Vertical With Storage

    Picture a small business owner in Jaipur running a home studio from a compact apartment — she switched from floor-level storage bins to wall-mounted shelving, freeing up nearly 15% of her usable floor space without losing any storage capacity.

    • Wall-mounted shelves keep floor space clear
    • Tall, narrow bookcases draw the eye upward, making ceilings feel higher
    • Use vertical space in closets and corners often left empty

    5. Multi-Functional Furniture Saves Real Space

    Furniture that does double duty reduces the total number of pieces needed in a room, which directly impacts how open it feels.

    • Ottomans with storage double as seating and storage
    • Extendable dining tables work for daily use and occasional guests
    • Sofa beds eliminate the need for a separate guest room setup

    6. Keep Window Treatments Minimal

    Heavy curtains and layered window treatments block light and visually lower ceiling height. Has this ever crossed your mind while decorating — how much a bulky curtain rod can shrink a room’s perceived size?

    • Choose sheer or light-colored curtains that let natural light through
    • Mount curtain rods closer to the ceiling, not just above the window frame
    • Avoid excessive layering of blinds and curtains together

    7. Declutter Ruthlessly

    This sounds obvious, but it’s genuinely the most underrated item on this list. No decorating trick works if a small room is packed with unnecessary items.

    • Keep surfaces mostly clear — a few curated items look better than many small ones
    • Store seasonal items elsewhere, rotating decor rather than displaying everything at once
    • Use closed storage for visual clutter, open shelving only for a few intentional pieces

    8. Zone the Space Without Walls

    For studio apartments or open layouts, creating visual zones without physical walls helps rooms feel organized rather than chaotic. [link to related decorating ideas guide here]

    • Use rugs to define separate functional areas within one room
    • Different lighting fixtures can subtly signal a change in “zone”
    • Furniture arrangement itself can create implied boundaries between spaces

    Frequently Asked Questions

    Q1: What’s the single best trick to make a small room look bigger? Strategic mirror placement, especially opposite a window, tends to have the most immediate visual impact for the least cost and effort.

    Q2: Should small rooms always use light colors? Generally yes, though a well-lit small room can sometimes handle a bold accent wall without feeling cramped — balance matters more than avoiding color entirely.

    Q3: Does furniture size matter more than furniture quantity in small spaces? Both matter, but oversized furniture in a small room often has a bigger negative impact than simply having a few too many smaller pieces.

    Q4: Are open shelves better than closed cabinets for small spaces? A mix works best — closed storage hides clutter, while a few open shelves add personality without overwhelming the room visually.

    Q5: Can small space decorating ideas work in rental apartments? Yes, most of these tips — mirrors, furniture choice, color, decluttering — require no permanent changes and work well in rentals.

    Q6: How much does it typically cost to redecorate a small space using these ideas? Costs vary widely, but many of these changes (decluttering, rearranging, minimal curtains) cost very little beyond a few key purchases like mirrors or shelving.


    Conclusion

    The best small space decorating ideas aren’t about buying more — they’re about being intentional with what stays visible and how light moves through the room. Start with a mirror and a decluttering session this weekend; both cost little and make an immediate difference. From there, gradually swap in furniture with visible legs and vertical storage as your budget allows.


    Suggested Image Alt Text:

    1. “Large mirror reflecting natural light in a small living room”
    2. “Wall-mounted shelving maximizing storage in compact apartment”
    3. “Light-colored furniture with visible legs in a small bedroom”
  • DIY Exterior Painting Tips for a Professional Finish

    DIY Exterior Painting Tips for a Professional Finish

    Introduction

    Exterior painting looks simple until you actually start — then you realize why professionals charge what they do. Still, with the right DIY exterior painting tips, a motivated homeowner can pull off a genuinely good finish without hiring a full crew. I tried this myself on a small independent house a couple of summers back, and honestly, the prep work mattered far more than the actual painting. This guide walks through what actually makes the difference between an amateur-looking job and one that holds up for years, going into 2026.


    1. Choose the Right Weather Window

    Timing matters more than most people realize before starting an exterior paint job.

    Quick answer: The best time for DIY exterior painting is during dry weather with moderate temperatures, ideally avoiding monsoon season entirely and extreme summer heat, since both humidity and excessive heat affect paint adhesion and drying quality.

    2. Prep the Surface Properly (Don’t Skip This)

    I’ve noticed most DIY paint jobs fail here, not in the actual painting. Surface prep is tedious, but skipping it shows within months.

    • Scrape off peeling or flaking old paint completely
    • Fill cracks and holes with exterior-grade filler before painting
    • Wash the surface thoroughly to remove dirt, mold, and grease buildup

    3. Prime Before You Paint

    Skipping primer is one of the most common DIY exterior painting mistakes, especially on surfaces with patchy old paint or exposed plaster. [link to related home improvement ideas guide here]

    Direct answer: Applying a quality exterior primer before painting ensures better paint adhesion, more even color coverage, and longer-lasting results — skipping this step often leads to patchy finishes and paint peeling prematurely within a year or two.

    4. Choose Weather-Resistant Exterior Paint

    Not all paint is created equal for outdoor use. Exterior-specific paints handle UV exposure, rain, and temperature swings far better than interior formulations.

    • Look for paints rated for exterior use with UV resistance
    • Weatherproof or elastomeric paints work well for regions with heavy monsoon exposure
    • Budget roughly ₹200-400 per liter for quality exterior paint in India

    5. Use the Right Tools for Different Surfaces

    Picture a small business owner in Jaipur painting her shop’s exterior wall — she used a roller for the flat wall sections but switched to a brush for window frames and trim, getting a noticeably cleaner finish than using just one tool throughout.

    • Rollers work best for large, flat wall areas
    • Brushes handle trim, corners, and detailed edges better
    • Sprayers save time on large surfaces but require more setup and skill

    6. Apply in Thin, Even Coats

    Has this ever happened to you — applying paint too thick, hoping to finish faster, only to end up with drips and uneven texture? Thin, even coats always look better than one thick, rushed layer.

    • Apply two thin coats rather than one thick coat
    • Allow proper drying time between coats (check product label, usually 4-6 hours)
    • Avoid painting in direct harsh sunlight, which dries paint too quickly and unevenly

    7. Protect Surrounding Areas

    Simple prep work here saves significant cleanup time later and prevents accidental paint on windows, fixtures, or plants.

    • Cover windows, door frames, and fixtures with painter’s tape
    • Use drop cloths to protect flooring or plants below the work area
    • Remove or cover outdoor furniture and decor before starting

    8. Know When to Call a Professional Instead

    DIY works well for single-story homes and manageable surface areas. For multi-story exteriors requiring scaffolding, or surfaces with significant structural damage, it’s worth hiring professionals instead. [link to related roof replacement signs guide here]


    Frequently Asked Questions

    Q1: How long does DIY exterior painting typically take? For an average-sized home, expect 3-5 days including prep work, priming, and two coats of paint, depending on surface area.

    Q2: What’s the biggest mistake people make with exterior painting? Skipping proper surface preparation — cleaning, scraping, and priming — which causes paint to peel prematurely within a year or two.

    Q3: Can I paint over old, peeling exterior paint? No, peeling paint should always be scraped off first; painting over it leads to poor adhesion and quicker peeling of the new coat too.

    Q4: What’s the best season for exterior painting in India? Post-monsoon and pre-summer months generally offer the most stable, dry weather conditions ideal for exterior painting projects.

    Q5: How much paint do I need for an average home exterior? This varies by home size, but roughly 1 liter covers 100-120 square feet per coat — calculate total wall area before purchasing.

    Q6: Is it cheaper to DIY exterior painting compared to hiring professionals? Generally yes, DIY can save 40-60% compared to professional labor costs, though it requires more time and physical effort.


    Conclusion

    Getting a professional finish with DIY exterior painting tips really comes down to patience during prep work and applying paint in thin, controlled coats. Rushing the process is where most amateur jobs go wrong. Set aside a proper weekend, gather the right tools, and tackle one wall section at a time — the results genuinely hold up if you follow the basics carefully.


    Suggested Image Alt Text:

    1. “Homeowner applying exterior paint with a roller on wall”
    2. “Prepping exterior wall surface before DIY painting project”
    3. “Painter’s tape protecting window frames during exterior painting”
  • How to Choose Paint Color for Every Room

    How to Choose Paint Color for Every Room

    Introduction

    Standing in front of a paint shop wall with 40 shades of white can genuinely paralyze anyone. I’ve been there — picked a color that looked perfect on the swatch, then watched it turn oddly yellow once it covered an entire bedroom wall. Learning how to choose paint color properly isn’t about picking your favorite shade blindly. It’s about understanding light, room function, and how color actually behaves at scale. This guide walks through room-by-room considerations so your next paint job doesn’t end in regret, going into 2026.


    1. Understand Natural Light Before Anything Else

    This is the single biggest factor people ignore, and it changes everything about how a color actually looks.

    Quick answer: When learning how to choose paint color, always test swatches on the actual wall under both natural daylight and artificial lighting — colors can look dramatically different depending on the room’s light exposure and time of day.

    2. Living Room — Warm, Welcoming Tones

    Living rooms benefit from colors that feel inviting without being overwhelming, since this is where most social interaction happens.

    • Warm neutrals like beige or soft taupe work well for most spaces
    • Sage green or muted blue add character without feeling too bold
    • Avoid overly dark colors unless the room gets significant natural light

    I’ve noticed people shy away from color entirely in living rooms, defaulting to plain white. It’s safe, sure, but a slightly warmer neutral often makes the space feel more finished.

    3. Bedroom — Calming, Restful Shades

    Direct answer: For bedrooms, soft, muted colors like dusty blue, sage green, or warm grey work best since they promote a calmer atmosphere conducive to rest, while bright or highly saturated colors can feel overstimulating in a space meant for relaxation.

    • Avoid bright reds or oranges — they can feel too energizing for sleep spaces
    • Soft pastels work particularly well in smaller bedrooms
    • Consider darker accent walls for a cozier, more intimate feel

    4. Kitchen — Bright and Practical

    Kitchens deal with grease, splashes, and heavy daily use, so both color and finish matter here. [link to related kitchen renovation cost guide here]

    • Light, bright colors make kitchens feel larger and cleaner
    • Semi-gloss or satin finishes hold up better against grease and moisture
    • Yellow, soft white, or light grey are popular practical choices

    5. Bathroom — Fresh and Moisture-Resistant

    Picture a small business owner in Jaipur who painted her bathroom a beautiful matte navy blue, only to watch it develop mold patches within months due to humidity. Bathroom paint needs to prioritize function over just color choice.

    • Always use moisture-resistant or bathroom-specific paint formulations
    • Light blues, soft greens, or crisp whites work well for a fresh feel
    • Avoid matte finishes — they trap moisture more than satin or semi-gloss

    6. Home Office — Focus-Friendly Colors

    With more people working from home, this room deserves thought too. Colors that promote focus without feeling sterile work best here.

    • Soft blues and greens are associated with improved concentration
    • Avoid overly bright or high-contrast colors that can cause visual fatigue
    • Consider an accent wall behind your desk setup for visual interest

    7. How to Actually Test Paint Before Committing

    Has this ever happened to you — painting an entire room, only to hate the color once it’s fully dry and covering every wall? Testing properly avoids this completely.

    • Buy small sample pots before committing to a full room
    • Paint a section at least 2×2 feet, and view it at different times of day
    • Let samples dry fully — wet paint color often looks different than dried

    8. Coordinating Colors Across Connected Spaces

    For open-plan homes, colors need to flow logically between rooms rather than clashing at doorways. [link to related decorating ideas guide here]

    • Choose a base neutral that works across multiple connected rooms
    • Use one or two accent colors consistently throughout, rather than a different bold shade per room
    • Test transitions at doorways and hallways specifically, not just individual rooms

    Frequently Asked Questions

    Q1: How do I choose a paint color without seeing it in my actual room first? Always test physical samples on your walls — online or in-store swatches rarely represent how color appears under your specific lighting.

    Q2: What’s the safest paint color choice for resale value? Neutral tones like soft white, warm beige, or light grey tend to appeal to the widest range of buyers if you’re planning to sell.

    Q3: Should ceiling color match wall color? Not necessarily — a slightly lighter shade or classic white ceiling often works better, helping rooms feel taller and more open.

    Q4: How many paint samples should I test before deciding? Testing 2-3 shortlisted colors is usually enough; testing too many at once can make the decision more confusing, not less.

    Q5: Do small rooms need lighter paint colors? Generally yes, lighter colors help small rooms feel more spacious, though a well-lit small room can sometimes handle darker, moodier tones too.

    Q6: How often should I repaint a room? Most interior paint lasts 5-7 years before needing a refresh, depending on wear, sunlight exposure, and room usage.


    Conclusion

    Learning how to choose paint color properly comes down to testing in real conditions, understanding room function, and resisting the urge to decide from a tiny swatch alone. Take the time to sample colors on your actual walls before committing to gallons of paint. Pick one room to start with this month, test a few shortlisted shades, and you’ll likely land on something you’re genuinely happy living with for years.


    Suggested Image Alt Text:

    1. “Paint swatches being tested on a living room wall”
    2. “Soft blue bedroom paint creating a calm atmosphere”
    3. “Bright kitchen wall painted in light, practical color”